
Hi Friends! Today I am going to show you how to draw faces! This is an essential skill that sometimes can be a bit intimidating for beginners! Proportions can be difficult but once you master them you can draw all kinds of people.
Watch the video below for a 20 minute tutorial and read on for a list of steps on how to draw a face. All you need is a pencil and paper!
In part one we are sketching the face and in part two I will teach you how to color in your illustration.
Before we get started I want to let you know the paper I am using is Strathmore Bristol Paper - Smooth Surface.
Steps to make the head shape:
Think about the size you want the head to be first. Then sketch out a line for the top and bottom of the head, then left and right of the head.
Divide the square shape you have in half first vertically then in half horizontally.
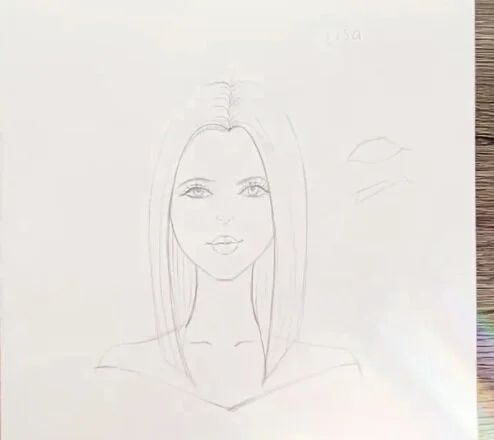
Connect your four lines together, thinking of it as an almond shape. The top half of your circle will be wider (the forehead section), and the bottom half will be narrower (the chin section).
Now that you have a rough shape of the head, sketch out the neck relative to the size of your head. Remember to make it not too thin and not too wide. To see an example check out the video above.
Now divide the top half of the head into 3 parts horizontally, repeat this in the bottom half. You should have 6 sections total.
Steps to add the detail of the face:
The top line you have made inside your head shape is going to be the hairline. Remember hair has thickness so as you sketch out the hair add volume above the head. Its okay if it is a rough sketch at first! Just focus on getting the shape of the hair you want.
The second line is going to be where you draw the eyebrows. I like to make an angled shape for the eyebrows.
The center line is going to be the eyes. This is a VERY IMPORTANT SECTION. I like to think of eyes as a sideways leaf shape. Then I add another layer above for the eyelid. Finally add the shape of the eyeball and big lashes to make the eyes pop! Tip: Draw both eyes before moving on to make sure they look even.
The next line down is the nose. This is not something I emphasize in my faces, I just add a hint of a nose. The eyes are always my main focus with my faces.
The final line (one up from the chin) is going to be the bottom of the lips. To make a smile tilt the lines of the mouth slightly up.
Remember: You can edit as you go through your sketch! It does not need to be perfect.
Next Steps and Tips:
Erase your extra guidelines once you are happy with your face layout. (I use a kneaded eraser because it leaves no crumbs on the paper when you use it).
Usually I draw hair that covers ears, but if you are not they fall around the center line (where the eyes are).
Now is the time to go back through and perfect the lines, adding a bit more detail.
Hair: I like to draw more strands at the roots and draw some going down the hair. Also add more strands towards the front of the head.
I draw a collarbone at the end of the neck because it is a sign of femininity. I think it adds some elegance to my girls.
Emphasize: Emphasize the eyes and add more energy here. You can draw any makeup definition just like real life! I like to add eyeliner to my faces with a darker upperline on the eye. I also add a darker line to the middle of the lips to show separation between the top and bottom lips.
Once you have a basic face you can change the details, you just need to learn the proportions of a face! It’s really all about practice. To keep improving your illustration skills, sign up for my course Fashion Illustration 101. In the course you will learn how to draw inspiring fashion illustrations and even make money from your art! It’s time to invest in your passions, learn more at: rongrongdevoe.com/fashion-illustration-course


